Item Addition Method for Purchase, Stock Adjustment & Transfer
Learn how to implement configurable item addition behavior when searching and adding products in Purchase, Stock Adjustment, and Stock Transfer screens.
Overview
This feature allows you to control how products are added when using the search functionality on purchase, stock adjustment, and stock transfer pages. Instead of always creating a new row, you can configure the system to increase the quantity of an existing product row.
What Problem Does This Solve?
Before this feature:
- When adding the same product multiple times via search, it always created separate rows
- Users had to manually merge quantities or delete duplicate rows
- This was especially problematic when scanning barcodes repeatedly
After this feature:
- Configurable behavior per transaction type (Purchase, Adjustment, Transfer)
- Option 1: Add item in new row - Creates a new row each time (original behavior)
- Option 2: Increase item qty - Finds existing row and increments quantity (new behavior)
Feature Demo
Scenario: Adding Same Product Twice
With "Increase Item Qty" setting:
- Search and add "Canon 80D" → Qty: 1
- Search and add "Canon 80D" again → Qty updates to: 2 (same row)
With "Add Item in New Row" setting:
- Search and add "Canon 80D" → Row 1 with Qty: 1
- Search and add "Canon 80D" again → Row 2 with Qty: 1 (separate row)
Implementation Guide
Step 1: Create Database Migration
Create a new migration file to add three columns to the business table:
php artisan make:migration add_item_addition_method_to_purchase_adjustment_transfer
Migration file content:
<?php

use Illuminate\Database\Migrations\Migration;
use Illuminate\Database\Schema\Blueprint;
use Illuminate\Support\Facades\Schema;

return new class extends Migration
{
    /**
     * Run the migrations.
     *
     * @return void
     */
    public function up()
    {
        Schema::table('business', function (Blueprint $table) {
            $table->boolean('purchase_item_addition_method')->default(1)->after('item_addition_method');
            $table->boolean('adjustment_item_addition_method')->default(1)->after('purchase_item_addition_method');
            $table->boolean('transfer_item_addition_method')->default(1)->after('adjustment_item_addition_method');
        });
    }

    /**
     * Reverse the migrations.
     *
     * @return void
     */
    public function down()
    {
        Schema::table('business', function (Blueprint $table) {
            $table->dropColumn(['purchase_item_addition_method', 'adjustment_item_addition_method', 'transfer_item_addition_method']);
        });
    }
};
Run the migration:
php artisan migrate
Step 2: Create Settings UI for Purchase
Create a new partial view for purchase settings:
File: resources/views/business/partials/settings_purchase.blade.php
Add the following section to the existing file (or at the end):
<hr>
<div class="row">
    <div class="col-md-12"><h4>@lang('lang_v1.purchase_item_addition_method'):</h4></div>
</div>
<div class="col-sm-6">
    <div class="form-group">
        {!! Form::label('purchase_item_addition_method', __('lang_v1.purchase_item_addition_method') . ':') !!}
        {!! Form::select('purchase_item_addition_method', [ 0 => __('lang_v1.add_item_in_new_row'), 1 =>  __('lang_v1.increase_item_qty')], $business->purchase_item_addition_method ?? 1, ['class' => 'form-control select2', 'style' => 'width: 100%;']); !!}
    </div>
</div>
Step 3: Create Settings UI for Stock Adjustment
Create a new settings partial:
File: resources/views/business/partials/settings_adjustment.blade.php
<!-- Stock Adjustment related settings -->
<div class="pos-tab-content">
    <div class="row">
        <div class="col-md-12"><h4>@lang('lang_v1.adjustment_item_addition_method'):</h4></div>
        <div class="col-sm-6">
            <div class="form-group">
                {!! Form::label('adjustment_item_addition_method', __('lang_v1.adjustment_item_addition_method') . ':') !!}
                {!! Form::select('adjustment_item_addition_method', [ 0 => __('lang_v1.add_item_in_new_row'), 1 =>  __('lang_v1.increase_item_qty')], $business->adjustment_item_addition_method ?? 1, ['class' => 'form-control select2', 'style' => 'width: 100%;']); !!}
            </div>
        </div>
        <div class="clearfix"></div>
    </div>
</div>
Step 4: Create Settings UI for Stock Transfer
Create a new settings partial:
File: resources/views/business/partials/settings_transfer.blade.php
<!-- Stock Transfer related settings -->
<div class="pos-tab-content">
    <div class="row">
        <div class="col-md-12"><h4>@lang('lang_v1.transfer_item_addition_method'):</h4></div>
        <div class="col-sm-6">
            <div class="form-group">
                {!! Form::label('transfer_item_addition_method', __('lang_v1.transfer_item_addition_method') . ':') !!}
                {!! Form::select('transfer_item_addition_method', [ 0 => __('lang_v1.add_item_in_new_row'), 1 =>  __('lang_v1.increase_item_qty')], $business->transfer_item_addition_method ?? 1, ['class' => 'form-control select2', 'style' => 'width: 100%;']); !!}
            </div>
        </div>
        <div class="clearfix"></div>
    </div>
</div>
Step 5: Include Settings in Main Settings Page
File: resources/views/business/settings.blade.php
Add new tab menu items and include the partials:
<!-- In the tab menu list -->
<a href="#" class="list-group-item text-center">@lang('lang_v1.adjustment')</a>
<a href="#" class="list-group-item text-center">@lang('lang_v1.stock_transfers')</a>

<!-- In the tab content area -->
@include('business.partials.settings_purchase')
@include('business.partials.settings_adjustment')
@include('business.partials.settings_transfer')
Step 6: Add Language Translations
File: lang/en/lang_v1.php
Add the following translations:
'purchase_item_addition_method' => 'Purchase Item Addition Method',
'adjustment_item_addition_method' => 'Adjustment Item Addition Method',
'transfer_item_addition_method' => 'Transfer Item Addition Method',
'add_item_in_new_row' => 'Add Item in New Row',
'increase_item_qty' => 'Increase Item Qty',
Repeat for all other language files (lang/ar/lang_v1.php, lang/es/lang_v1.php, etc.)
Step 7: Update BusinessController
File: app/Http/Controllers/BusinessController.php
Update the postBusinessSettings method to include the new fields:
$business_details = $request->only([
    'name',
    'start_date',
    // ... other fields ...
    'item_addition_method',
    'purchase_item_addition_method',     // Add this
    'adjustment_item_addition_method',   // Add this
    'transfer_item_addition_method',     // Add this
    // ... rest of fields ...
]);
Step 8: Add Hidden Inputs in Create/Edit Views
Purchase Create Page
File: resources/views/purchase/create.blade.php
Add after page-level currency settings (around line 57):
<input type="hidden" id="purchase_item_addition_method" value="{{$business->purchase_item_addition_method ?? 1}}">
Stock Adjustment Create Page
File: resources/views/stock_adjustment/create.blade.php
Add after the form opening (around line 24):
<input type="hidden" id="adjustment_item_addition_method" value="{{$business->adjustment_item_addition_method ?? 1}}">
Stock Transfer Create Page
File: resources/views/stock_transfer/create.blade.php
Add after the form opening (around line 19):
<input type="hidden" id="transfer_item_addition_method" value="{{$business->transfer_item_addition_method ?? 1}}">
Do the same for edit pages (purchase/edit.blade.php, stock_transfer/edit.blade.php)
Step 9: Update Controllers to Pass Business Object
PurchaseController
File: app/Http/Controllers/PurchaseController.php
Update the create() method:
public function create()
{
    // ... existing code ...

    // Add this before return statement
    $business = \App\Business::find($business_id);

    return view('purchase.create')
        ->with(compact(
            'taxes',
            'orderStatuses',
            // ... other variables ...
            'business'  // Add this
        ));
}
StockAdjustmentController
File: app/Http/Controllers/StockAdjustmentController.php
Update the create() method:
public function create()
{
    // ... existing code ...

    // Add this
    $business = \App\Business::find($business_id);

    return view('stock_adjustment.create')
        ->with(compact('business_locations', 'business'));
}
StockTransferController
File: app/Http/Controllers/StockTransferController.php
Update both create() and edit() methods:
public function create()
{
    // ... existing code ...

    // Add this
    $business = \App\Business::find($business_id);

    return view('stock_transfer.create')
        ->with(compact('business_locations', 'statuses', 'business'));
}

public function edit($id)
{
    // ... existing code ...

    // Add this before return
    $business = \App\Business::find($business_id);

    return view('stock_transfer.edit')
        ->with(compact('sell_transfer', 'purchase_transfer', 'business_locations', 'statuses', 'products', 'business'));
}
Step 10: Update JavaScript Logic
Update purchase.js
File: public/js/purchase.js
Find the get_purchase_entry_row function and update it:
function get_purchase_entry_row(product_id, variation_id) {
    if (product_id) {
        // Check purchase item addition method
        var purchase_item_addtn_method = 0;
        var add_via_ajax = true;

        if ($('#purchase_item_addition_method').length) {
            purchase_item_addtn_method = parseInt($('#purchase_item_addition_method').val());
        }

        if (purchase_item_addtn_method === 0) {
            add_via_ajax = true;
        } else {
            var is_added = false;

            // Search for variation id in each row of purchase table
            $('#purchase_entry_table tbody')
                .find('tr')
                .each(function () {
                    var row_v_id = $(this)
                        .find('.hidden_variation_id')
                        .val();
                    var row_p_id = $(this)
                        .find('.hidden_product_id')
                        .val();

                    // Match by variation_id if it exists, otherwise match by product_id
                    var is_match = false;
                    if (variation_id != null && row_v_id == variation_id) {
                        is_match = true;
                    } else if (variation_id == null && row_p_id == product_id) {
                        is_match = true;
                    }

                    if (is_match && !is_added) {
                        add_via_ajax = false;
                        is_added = true;

                        // Increment product quantity
                        qty_element = $(this).find('.purchase_quantity');
                        var qty = __read_number(qty_element, true);
                        __write_number(qty_element, qty + 1, true);
                        qty_element.change();
                    }
                });
        }

        if (add_via_ajax) {
            // ... existing AJAX code ...
        }
    }
}
Update stock_adjustment.js
File: public/js/stock_adjustment.js
Update the function signature and logic:
// Update the autocomplete select callback
select: function(event, ui) {
    if (ui.item.qty_available > 0) {
        $(this).val(null);
        stock_adjustment_product_row(ui.item.product_id, ui.item.variation_id);  // Pass product_id
    } else {
        alert(LANG.out_of_stock);
    }
}

// Update the function
function stock_adjustment_product_row(product_id, variation_id) {
    // Check adjustment item addition method
    var adjustment_item_addtn_method = 0;
    var add_via_ajax = true;

    if ($('#adjustment_item_addition_method').length) {
        adjustment_item_addtn_method = parseInt($('#adjustment_item_addition_method').val());
    }

    if (adjustment_item_addtn_method === 0) {
        add_via_ajax = true;
    } else {
        var is_added = false;

        // Search for variation id in each row of adjustment table
        $('table#stock_adjustment_product_table tbody')
            .find('tr')
            .each(function () {
                var row_v_id = $(this)
                    .find('input[name*="[variation_id]"]')
                    .val();
                var row_p_id = $(this)
                    .find('input[name*="[product_id]"]')
                    .val();

                // Match by variation_id if it exists, otherwise match by product_id
                var is_match = false;
                if (variation_id != null && row_v_id == variation_id) {
                    is_match = true;
                } else if (variation_id == null && row_p_id == product_id) {
                    is_match = true;
                }

                if (is_match && !is_added) {
                    add_via_ajax = false;
                    is_added = true;

                    // Increment product quantity
                    qty_element = $(this).find('.product_quantity');
                    var qty = __read_number(qty_element);
                    __write_number(qty_element, qty + 1);
                    qty_element.change();
                }
            });
    }

    if (add_via_ajax) {
        // ... existing AJAX code ...
    }
}
Update stock_transfer.js
File: public/js/stock_transfer.js
Apply the same changes as stock_adjustment.js:
// Update autocomplete select
select: function(event, ui) {
    if (ui.item.qty_available > 0) {
        $(this).val(null);
        stock_transfer_product_row(ui.item.product_id, ui.item.variation_id);  // Pass product_id
    } else {
        alert(LANG.out_of_stock);
    }
}

// Update the function (same logic as adjustment)
function stock_transfer_product_row(product_id, variation_id) {
    // ... same implementation as stock_adjustment.js but use transfer_item_addition_method ...
}
How to Use
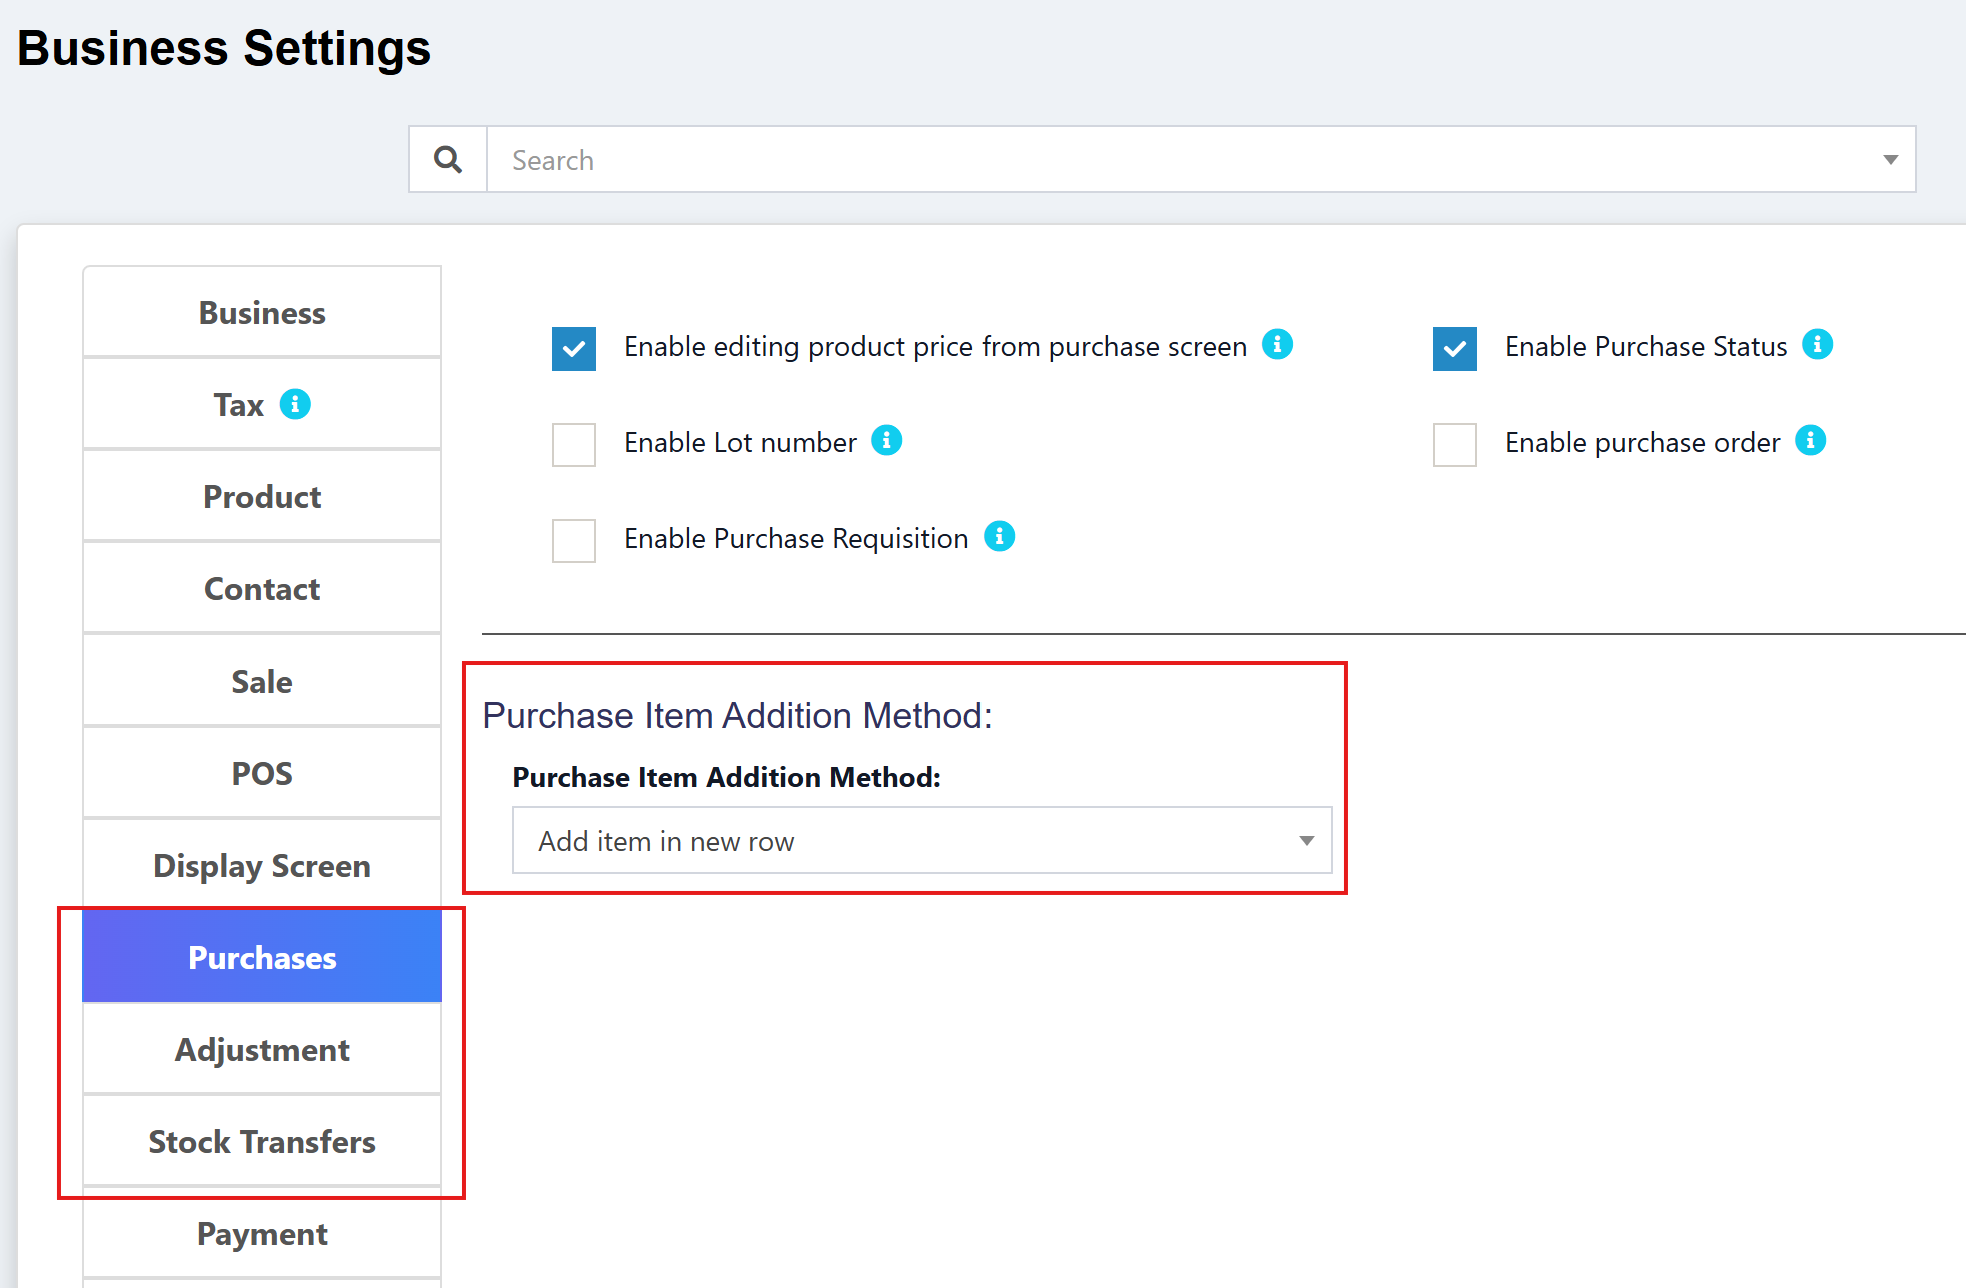
Configure Settings
- Go to Settings → Business Settings
- Navigate to:
- Purchases tab → Set "Purchase Item Addition Method"
- Adjustment tab → Set "Adjustment Item Addition Method"
- Stock Transfers tab → Set "Transfer Item Addition Method"
- Choose your preferred option for each:
- Add item in new row (0) - Always creates new rows
- Increase item qty (1) - Increments quantity in existing row
- Click Update Settings
Testing
Test Purchase Page
- Go to Purchases → Add Purchase
- Select a supplier and location
- Search and add a product (e.g., "Canon 80D")
- Search and add the same product again
- Expected behavior:
- If setting = Increase item qty: Quantity updates to 2 in same row
- If setting = Add item in new row: Two separate rows appear
Test Stock Adjustment Page
- Go to Stock Adjustment → Add
- Select a location
- Search and add a product twice
- Verify behavior matches your setting
Test Stock Transfer Page
- Go to Stock Transfer → Add
- Select from/to locations
- Search and add a product twice
- Verify behavior matches your setting
Troubleshooting
Issue: Setting always increases quantity regardless of configuration
Cause: Browser cache or business object not passed to view
Solution:
- Clear browser cache (Ctrl + Shift + R)
- Verify hidden input value in page source:
<input type="hidden" id="purchase_item_addition_method" value="0"> - If value is always "1", check that controller passes
$businessobject
Issue: Simple products (without variations) always create new rows
Cause: JavaScript only checks variation_id, ignoring product_id
Solution: Ensure JavaScript includes the product_id matching logic as shown in Step 10
Issue: Settings not saving
Cause: Controller not including new fields in allowed list
Solution: Verify BusinessController::postBusinessSettings includes all three fields
Key Technical Points
Why Three Separate Settings?
Different transaction types have different usage patterns:
- Purchase: Often need separate rows for lot numbers or expiry dates
- Adjustment: Usually want to consolidate quantities
- Transfer: Mixed usage depending on business needs
Product vs Variation Matching
The logic handles both simple and variable products:
// Variable products: Match by variation_id
if (variation_id != null && row_v_id == variation_id) {
    is_match = true;
}
// Simple products: Match by product_id
else if (variation_id == null && row_p_id == product_id) {
    is_match = true;
}
This ensures:
- ✅ Variable products (with sizes, colors, etc.) match by variation
- ✅ Simple products match by product ID
Default Value Strategy
All settings default to 1 (Increase item qty):
- Maintains backward compatibility
- Aligns with POS behavior
- Reduces duplicate rows for new users
Related Features
Summary
This feature provides fine-grained control over how products are added to purchase, adjustment, and transfer transactions. By allowing per-transaction-type configuration, businesses can optimize their workflow based on specific needs while maintaining flexibility across different operations.
Benefits:
- ⚡ Faster data entry with quantity increments
- 🎯 Fewer duplicate rows to manage
- 📦 Better barcode scanning experience
- ⚙️ Configurable per transaction type
- 🔄 Works with both simple and variable products
💛 Support this project